 Pin it
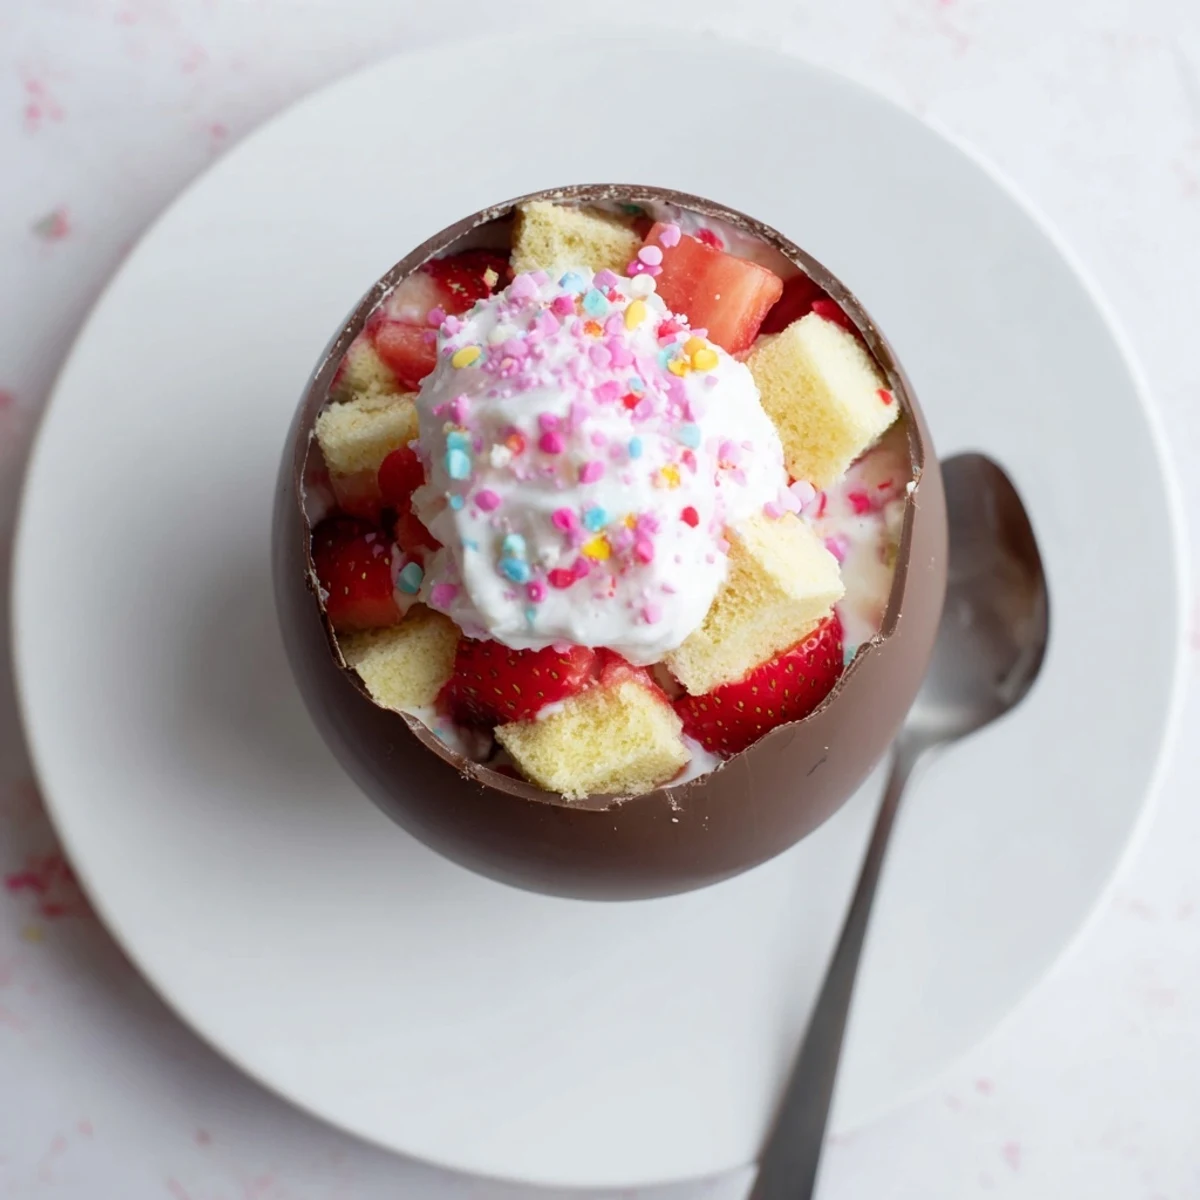
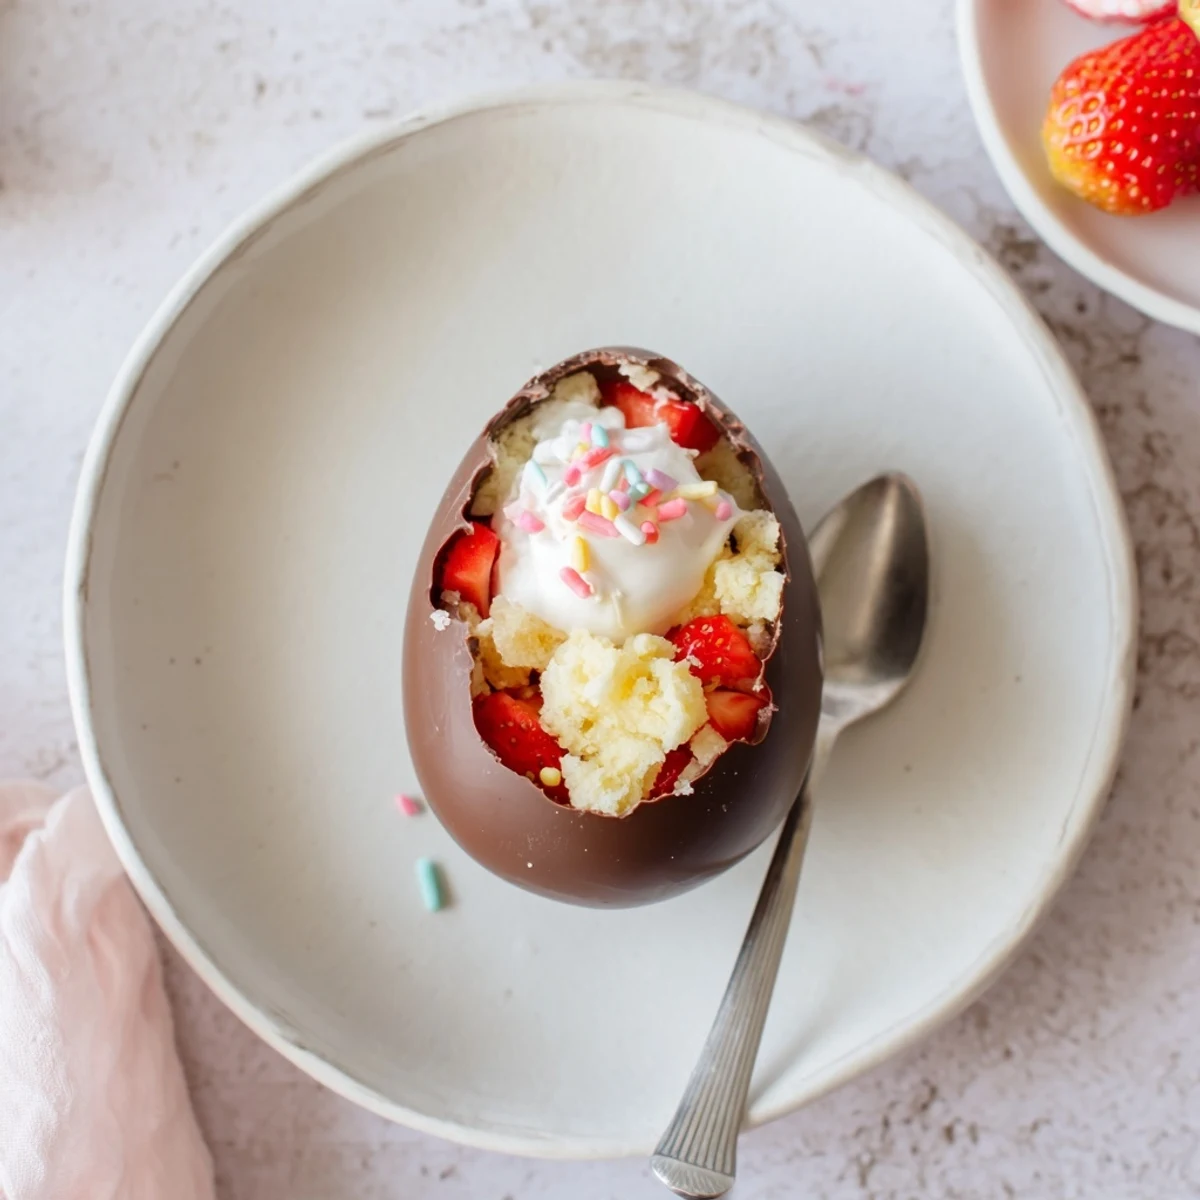
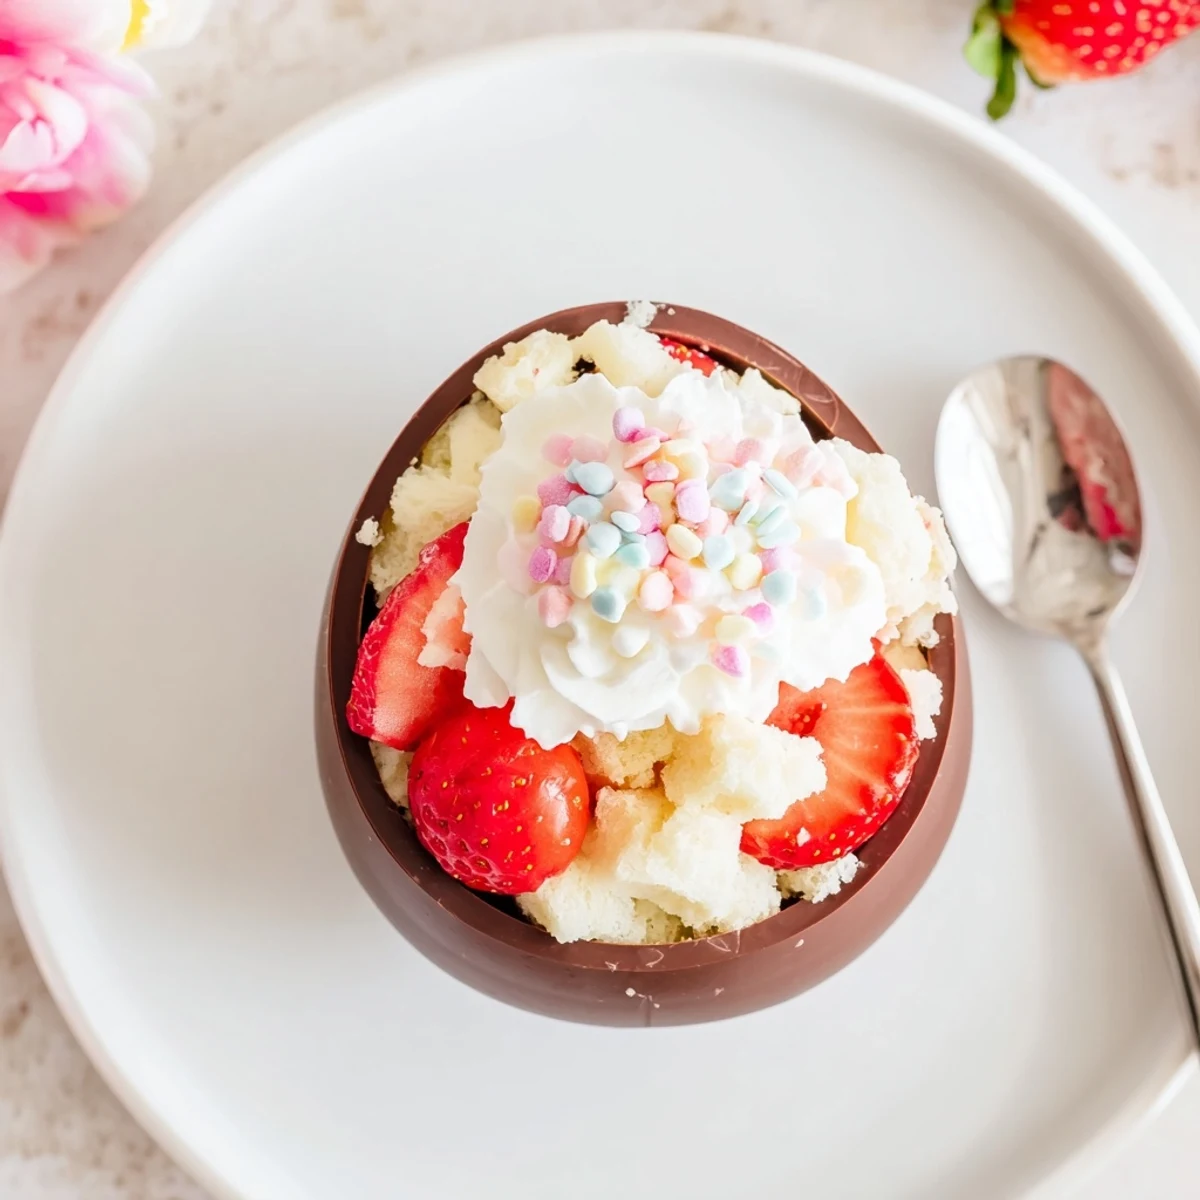
 These stunning Easter egg bombs combine classic strawberry shortcake flavors with a festive chocolate shell presentation. The tender, buttery shortcake provides the perfect base for sweet macerated strawberries and light whipped cream. Building them requires some patience—especially when creating the chocolate shells—but the result is an impressive dessert that captures spring whimsy.
The magic happens when you bite through the crisp chocolate exterior into the soft, creamy interior. Fresh strawberries bring natural sweetness and bright acidity, balancing the rich chocolate and buttery cake. Keep everything chilled until serving to maintain the shell's integrity and the cream's texture.
The first time I attempted these edible Easter eggs, my kitchen looked like a chocolate factory explosion. I had chocolate everywhere except where it belonged, and my daughter walked in, took one look at me covered in white chocolate streaks, and asked if the Easter Bunny had gotten into a fight. That messy afternoon taught me everything I know about working with chocolate shells, and now I can make these whimsical desserts without turning myself into a human confection.
Last spring I made three dozen of these for my neighborhood egg hunt, and the adults were more excited than the children. My neighbor Tom actually admitted he waited in the kitchen doorway just to watch peoples expressions when they bit into their eggs. Something about hiding dessert inside another dessert makes people feel like they are getting away with something magical.
Ingredients
- 1 1/2 cups all-purpose flour: The foundation of tender shortcake, and I have learned that measuring by weight rather than volume makes a noticeable difference in texture
- 1/4 cup granulated sugar: Just enough sweetness to let the strawberries shine without competing with the chocolate shell
- 2 tsp baking powder: This amount gives the shortcake the perfect lift, creating those tender air pockets that soak up the strawberry juices beautifully
- 1/4 tsp salt: Do not skip this, it balances the sweetness and makes all the flavors pop
- 1/3 cup unsalted butter, cold and cubed: Cold butter is non-negotiable here, and I keep mine in the freezer for 15 minutes before starting
- 1 large egg: Room temperature eggs incorporate better, so set yours out while you gather ingredients
- 1/2 cup heavy cream: This creates the most tender crumb imaginable, much better than milk in my experience
- 1 tsp vanilla extract: Use the good stuff here since vanilla is front and center in both cake and cream
- 2 cups fresh strawberries, hulled and diced: Pick berries that smell fragrant, as flavor comes from aroma more than appearance
- 2 tbsp granulated sugar: This draws out the strawberry juices creating that natural syrup that soaks into the cake
- 1 tsp lemon juice: A tiny splash that brightens the berries and prevents them from tasting too sweet
- 1 cup heavy whipping cream: Cold cream whips faster and holds its shape longer, so chill your bowl too
- 2 tbsp powdered sugar: Powdered sugar dissolves instantly into cream without any grainy texture
- 1/2 tsp vanilla extract: The same vanilla from the cake ties everything together beautifully
- 12 oz (340 g) white or milk chocolate, chopped: I prefer white chocolate for the spring aesthetic but milk chocolate lovers should go with what makes them happy
- Edible gold dust or pastel sprinkles: Completely optional but these tiny details make the eggs look like they came from a fancy bakery window
Instructions
- Bake the foundation:
- Preheat your oven to 400°F and line a baking sheet with parchment paper. Whisk together the flour, sugar, baking powder, and salt in a large bowl, then cut in the cold butter until the mixture looks like coarse crumbs with some pea-sized pieces remaining.
- Bring the dough together:
- Whisk the egg, heavy cream, and vanilla in a separate bowl, then pour into the flour mixture. Stir gently until just combined, turn onto a lightly floured surface, and pat into a 1-inch thick circle.
- Cut and bake:
- Cut rounds with a 2-inch cutter and place on the prepared baking sheet. Bake for 12 to 15 minutes until golden, then cool completely on a wire rack.
- Prepare the strawberries:
- Combine diced strawberries, sugar, and lemon juice in a bowl. Let sit for 10 to 15 minutes, stirring occasionally, until berries release their juices and become slightly syrupy.
- Whip the cream:
- Beat heavy cream with powdered sugar and vanilla until soft peaks form. Keep it refrigerated until assembly time so it stays firm and easy to work with.
- Create chocolate shells:
- Melt chocolate in a heatproof bowl over simmering water, stirring until completely smooth. Let it cool slightly until it feels like warm bath water, then brush the inside of Easter egg molds with a generous layer.
- Build surprise eggs:
- Chill molds until chocolate is firm, about 10 minutes, then apply a second coat for sturdiness. Gently unmold the shells, fill half with crumbled shortcake, juicy strawberries, and whipped cream, then top with another chocolate half.
- Add finishing touches:
- Decorate with gold dust or sprinkles if desired. Keep chilled until serving, and watch faces light up when the first egg gets cracked open.
 Pin it
 These have become my go-to contribution for spring gatherings because they combine nostalgia with surprise. Last year my grandmother, who insists she does not like dessert, ate two and asked for the recipe. Something about the playful presentation makes everyone feel like a kid again.
Getting the Chocolate Right
Temperature control makes or breaks these chocolate shells. I use an instant-read thermometer and aim for 88°F to 90°F when brushing the molds. Chocolate that is too warm slides right off, and chocolate that is too cool creates thick uneven coats. The perfect temperature feels slightly warm to the touch but not hot, and it should flow smoothly like heavy cream rather than thick molasses.
Assembly Strategy
Work quickly once you start assembling because the chocolate starts softening from the warmth of your hands and the fillings. I set up an assembly line with everything prepped and ready, and I keep a few extra shells on hand in case of breakage. The easiest method I have found is to fill the bottom half, warm the rim slightly with my finger, then press the top half on like a puzzle piece.
Make-Ahead Magic
The beauty of this recipe is that almost everything can be prepared in advance. I bake the shortcake up to two days ahead and store it in an airtight container, whip the cream the morning of, and prepare the strawberry filling a few hours before serving. The chocolate shells can be made weeks ahead and stored between layers of parchment in a cool dry place.
- Never store chocolate shells in the refrigerator or they will develop condensation and lose their shine
- Wait until the last hour to assemble the complete eggs, otherwise the shortcake gets soggy
- Keep finished eggs in the coolest part of your kitchen, not the fridge, to preserve the glossy chocolate finish
 Pin it
 These whimsical Easter egg bombs bring more joy to the table than any dessert I have ever made. There is something magical about cracking open chocolate to discover cake and cream inside, like finding a hidden treasure.
Recipe Questions & Answers
- → How far in advance can I make these?
-
Assemble these within 2-3 hours of serving for the best texture. The chocolate shells can be made 2-3 days ahead and stored in an airtight container at room temperature. Shortcake pieces can be baked a day ahead—keep them well-wrapped to prevent drying. Whip the cream and macerate the strawberries just before assembly.
- → What if I don't have Easter egg molds?
-
Use any hemisphere-shaped mold or even small bowls lined with plastic wrap. Alternatively, create chocolate bowls by inflating small water balloons, dipping them in melted chocolate, and chilling until set. The egg shape is traditional for Easter but not essential—these work in any chocolate shell form.
- → Can I use dark chocolate instead?
-
Absolutely. Dark chocolate (60-70% cocoa) creates a lovely contrast with the sweet strawberry filling and adds sophisticated depth. The same melting and molding techniques apply—just work slightly faster as dark chocolate can set more quickly than milk or white varieties.
- → Why did my chocolate shells crack?
-
Temperature fluctuations cause cracking. Let the chocolate set completely at room temperature before chilling, and avoid moving from cold to warm environments rapidly. Applying two thin coats rather than one thick one also improves strength. If working in a warm kitchen, keep molds chilled between coats.
- → Can I freeze these for later?
-
Freezing isn't recommended—the texture suffers significantly. The whipped cream becomes grainy, the shortcake loses its tender crumb, and the chocolate may develop sugar bloom (white spots) when thawed. These are best enjoyed fresh the same day they're assembled for optimal taste and texture.
- → How do I prevent the shortcake from getting soggy?
-
Ensure your strawberries are well-drained after macerating—excess liquid is the enemy. Pat them gently with paper towels before layering. Adding the shortcake pieces as the first layer against the chocolate (rather than directly against the juicy strawberries) also helps maintain structure.